The technique for flood icing biscuits
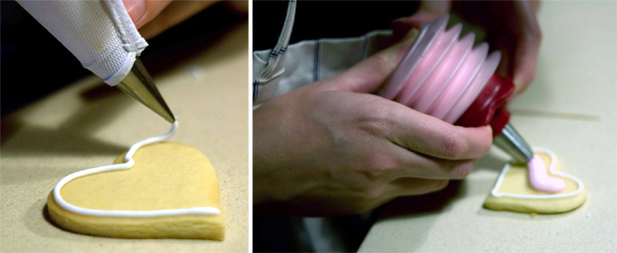
 There are two stages to the flood icing technique: first you use a thicker icing mixture to pipe the outline of the biscuit, and second you use a runnier icing to ‘flood’ the middle.
 Before you can start practising the flood icing technique, you’ll need to bake a batch of basic sugar cookies and allow them to cool. Once that’s done, it’s time to whip up the royal icing (which sounds fancy but is really very simple). For enough icing to cover about 50 medium-sized biscuits, you will need:
Ingredients for the icing:
500g icing sugar
2 egg whites
1 tsp lemon juice
Method: the outline
1. Sift the icing sugar into a large bowl and add the egg whites.
2. Using an electric whisk, beat on high speed for a few minutes.
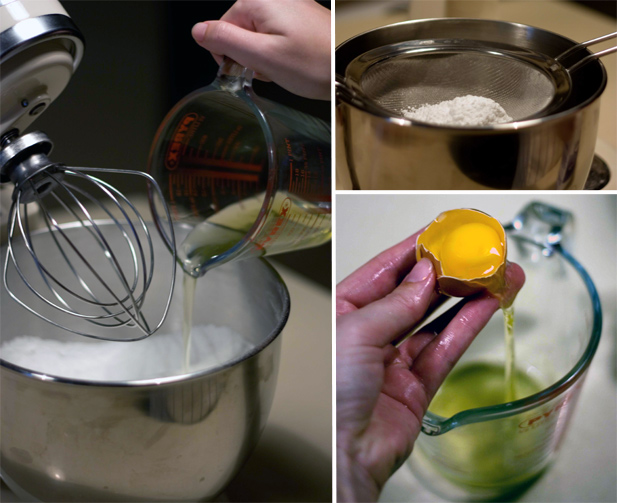 3. Add the lemon juice and beat again (the longer you beat it, the fluffier it will get so don’t be nervous of letting it go for a while – six to eight minutes total mixing time is ideal). You will land up with a relatively stiff and glossy meringue-like icing mixture which you will use to pipe the outline.
4. Transfer about 1/5th of this into a piping bag with a no. 2 nozzle and carefully trace the outline of each cookie.
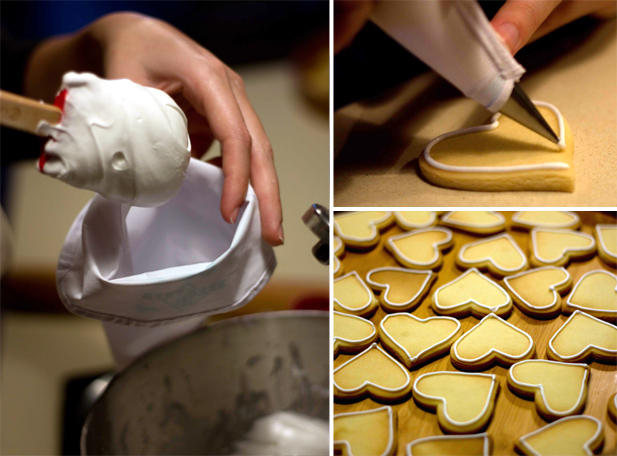 5. It can be a bit wobbly at first but you’ll soon get the hang of it – just go slowly and control the line by watching the pressure you place on the piping bag. Let them dry for a few minutes (at least).
Method: flooding the inside
1. While the outside edges are drying, loosen (dilute) the remainder of the icing. This can be done by either very carefully adding a few drops of water to the mixture, or simply adding another egg white and beating vigorously (the latter is preferable). You’re looking for a consistency which is smooth and fluid enough so that it will flow and settle within the outline you’ve created, but not too much so that it runs over. You can also use the “10 second rule” which says that it should take about 5-10 seconds for the surface of the icing to become flat again after drawing a line through it with your finger. It sounds terribly technical but really it’s best to just use your instinct, and play around with it. If you try one and it’s too thick and doesn’t run easily to the edges, simply loosen the icing a little more and try again. You’ll soon get a feel for the right consistency.
2. Transfer the remaining icing into a large piping bag with a no. 3 to no. 5 nozzle (the bigger to cookie, the bigger the nozzle), or use a food decor pen with the floral tip like we did.
3. Squirt some into the middle of the cookie (or zig zag some across the whole thing – whatever feels natural to you) and use a toothpick to gently push the icing to the edges. You can also pop any air bubbles which appear with the toothpick, and gently tap the cookie on your work surface to settle the icing.
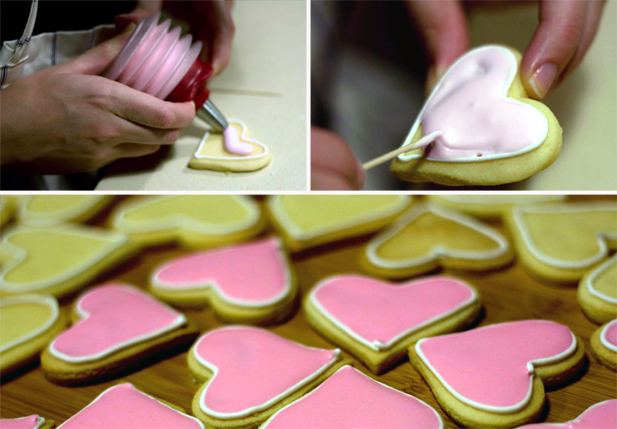
4. Once completed, put the cookies in a cool spot and allow to dry overnight.
Once dry, they are ready to eat… or you can add more detail.
Happy icing!